

How To Create A Tag For Docker Image
Docker has changed the way we build, package, and deploy applications. But this concept of packaging apps in containers isn't new—it was in existence long before Docker.
Docker just made container technology easy for people to use. This is why Docker is a must-have in most development workflows today. Most likely, your dream company is using Docker right now.
Docker's official documentation has a lot of moving parts. Honestly, it can be overwhelming at first. You could find yourself needing to glean information here and there to build that Docker image you've always wanted to build.
Maybe building Docker images has been a daunting task for you, but it won't be after you read this post. Here, you'll learn how to build—and how not to build—Docker images. You'll be able to write a Dockerfile and publish Docker images like a pro.
Install Docker
First, you'll need to install Docker. Docker runs natively on Linux. That doesn't mean you can't use Docker on Mac or Windows. In fact, there's Docker for Mac and Docker for Windows. I won't go into details on how to install Docker on your machine in this post. If you're on a Linux machine, this guide will help you get Docker up and running.
Now that you have Docker set up on your machine, you're one step closer to building images with Docker. Most likely, you'll come across two terms—"containers" and "images"—that can be confusing.
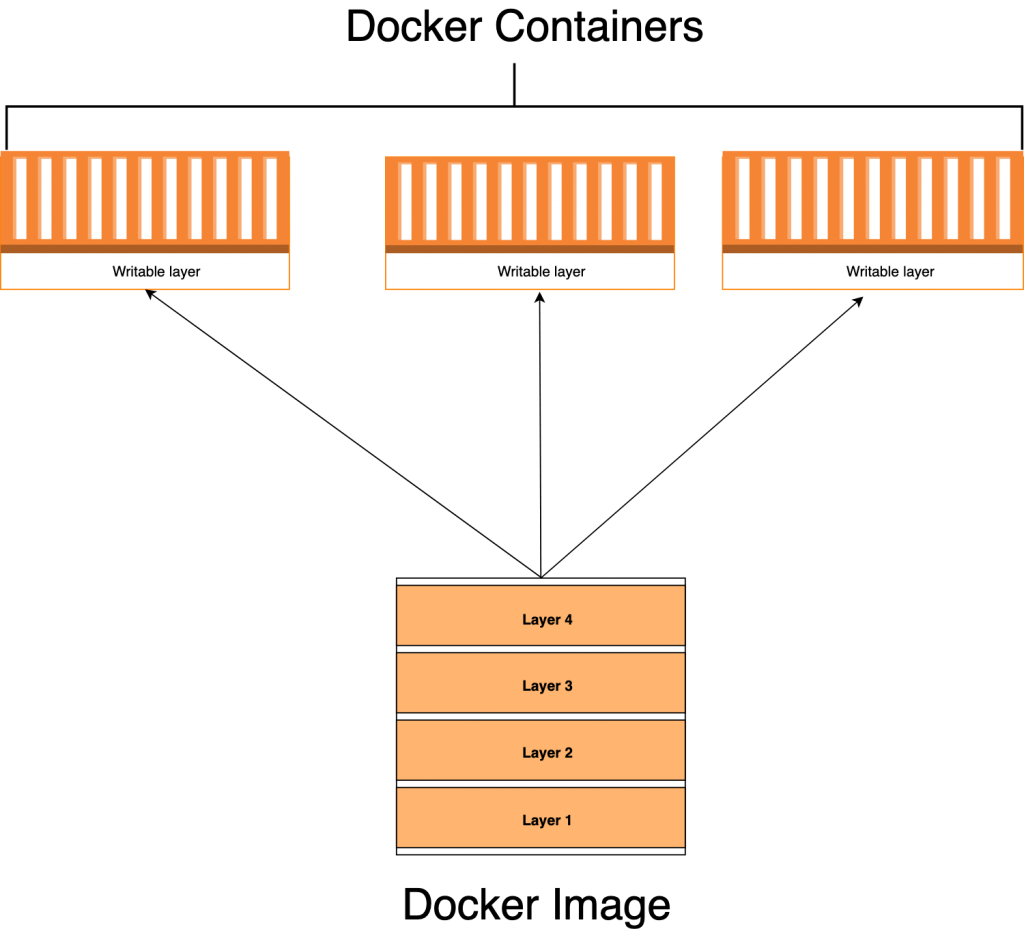
Docker images and Containers
Docker containers are instances of Docker images, whether running or stopped. In fact, the major difference between Docker containers and images is that containers have a writable layer.
When you create a Docker container, you're adding a writable layer on top of the Docker image. You can run many Docker containers from the same Docker image. You can see a Docker container as an instance of a Docker image.
Building your first Docker image
It's time to get our hands dirty and see how Docker build works in a real-life app. We'll generate a simple Node.js app with an Express app generator. Express generator is a CLI tool used for scaffolding Express applications. After that, we'll go through the process of using Docker build to create a Docker image from the source code.
We start by installing the express generator as follows:
$ npm install express-generator -g
Next, we scaffold our application using the following command:
$ express docker-app
Now we install package dependencies:
$ npm install
Start the application with the command below:
$ npm start
If you point your browser tohttp://localhost:3000, you should see the application default page, with the text "Welcome to Express."

Dockerfile
Mind you, the application is still running on your machine, and you don't have a Docker image yet. Of course, there are no magic wands you can wave at your app and turn it to a Docker container all of a sudden. You've got to write a Dockerfile and build an image out of it.
Docker's official docs define Dockerfile as "a text document that contains all the commands a user could call on the command line to assemble an image." Now that you know what a Dockerfile is, it's time to write one.
At the root directory of your application, create a file with the name "Dockerfile."
$ touch Dockerfile
Dockerignore
There's an important concept you need to internalize—always keep your Docker image as lean as possible. This means packaging only what your applications need to run. Please don't do otherwise.
In reality, source code usually contain other files and directories like .git, .idea, .vscode, or travis.yml. Those are essential for our development workflow, but won't stop our app from running. It's a best practice not to have them in your image—that's what .dockerignore is for. We use it to prevent such files and directories from making their way into our build.
Create a file with the name.dockerignore at the root folder with this content:
.git .gitignore node_modules npm-debug.log Dockerfile* docker-compose* README.md LICENSE .vscode
The base image
Dockerfile usually starts from a base image. As defined in the Docker documentation, a base image or parent image is where your image is based. It's your starting point. It could be an Ubuntu OS, Redhat, MySQL, Redis, etc.
Base images don't just fall from the sky. They're created—and you too can create one from scratch. There are also many base images out there that you can use, so you don't need to create one in most cases.
We add the base image to Dockerfile using theFROM command, followed by the base image name:
# Filename: Dockerfile FROM node:10-alpine
Copying source code
Let's instruct Docker to copy our source during Docker build:
# Filename: Dockerfile FROM node:10-alpine WORKDIR /usr/src/app COPY package*.json ./ RUN npm install COPY . .
First, we set the working directory usingWORKDIR. We then copy files using theCOPY command. The first argument is the source path, and the second is the destination path on the image file system. We copypackage.jsonand install our project dependencies usingnpm install. This will create thenode_modules directory that we once ignored in .dockerignore.
You might be wondering why we copied package.json before the source code. Docker images are made up of layers. They're created based on the output generated from each command. Since the filepackage.json does not change often as our source code, we don't want to keep rebuildingnode_modules each time we run Docker build.
Copying over files that define our app dependencies and install them immediately enables us to take advantage of the Docker cache. The main benefit here is quicker build time. There's a really nice blog post that explains this concept in detail.
Want to improve your code? Try Stackify's free code profiler, Prefix, to write better code on your workstation. Prefix works with .NET, Java, PHP, Node.js, Ruby, and Python.
Exposing a port
Exposing port 3000 informs Docker which port the container is listening on at runtime. Let's modify the Docker file and expose the port 3000.
# Filename: Dockerfile FROM node:10-alpine WORKDIR /usr/src/app COPY package*.json ./ RUN npm install COPY . . EXPOSE 3000
Docker CMD
TheCMD command tells Docker how to run the application we packaged in the image. The CMD follows the formatCMD ["command", "argument1", "argument2"].
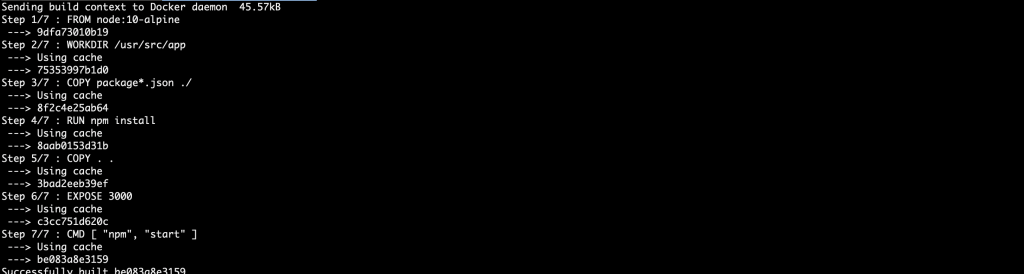
# Filename: Dockerfile FROM node:10-alpine WORKDIR /usr/src/app COPY package*.json ./ RUN npm install COPY . . EXPOSE 3000 CMD ["npm", "start"]
Building Docker images
With Dockerfile written, you can build the image using the following command:
$ docker build .
We can see the image we just built using the commanddocker images.
$ docker images REPOSITORY TAG IMAGE ID CREATED SIZE <none> <none> 7b341adb0bf1 2 minutes ago 83.2MB
Tagging a Docker image
When you have many images, it becomes difficult to know which image is what. Docker provides a way to tag your images with friendly names of your choosing. This is known as tagging.
$ docker build -t yourusername/repository-name .
Let's proceed to tag the Docker image we just built.
$ docker build -t yourusername/example-node-app
If you run the command above, you should have your image tagged already. Runningdocker imagesagain will show your image with the name you've chosen.
$ docker images REPOSITORY TAG IMAGE ID CREATED SIZE abiodunjames/example-node-app latest be083a8e3159 7 minutes ago 83.2MB
Running a Docker image
You run a Docker image by using thedocker run API. The command is as follows:
$ docker run -p80:3000 yourusername/example-node-app
The command is pretty simple. We supplied-p argument to specify what port on the host machine to map the port the app is listening on in the container. Now you can access your app from your browser on https://localhost.
To run the container in a detached mode, you can supply argument -d:
$ docker run -d -p80:3000 yourusername/example-node-app
A big congrats to you! You just packaged an application that can run anywhere Docker is installed.
Pushing a Docker image to Docker repository
The Docker image you built still resides on your local machine. This means you can't run it on any other machine outside your own—not even in production! To make the Docker image available for use elsewhere, you need to push it to a Docker registry.
A Docker registry is where Docker images live. One of the popular Docker registries is Docker Hub. You'll need an account to push Docker images to Docker Hub, and you can create one here.
With your Docker Hub credentials ready, you need only to log in with your username and password.
$ docker login
Retag the image with a version number:
$ docker tag yourusername/example-node-app yourdockerhubusername/example-node-app:v1
Then push with the following:
$ docker push abiodunjames/example-node-app:v1
If you're as excited as I am, you'll probably want to poke your nose into what's happening in this container, and even do cool stuff with Docker API.
You can list Docker containers:
$ docker ps
And you can inspect a container:
$ docker inspect <container-id>
You can view Docker logs in a Docker container:
$ docker logs <container-id>
And you can stop a running container:
$ docker stop <container-id>
Logging and monitoring are as important as the app itself. You shouldn't put an app in production without proper logging and monitoring in place, no matter what the reason. Retrace provides first-class support for Docker containers. This guide can help you set up a Retrace agent.
Conclusion
The whole concept of containerization is all about taking away the pain of building, shipping, and running applications. In this post, we've learned how to write Dockerfile as well as build, tag, and publish Docker images. Now it's time to build on this knowledge and learn about how to automate the entire process using continuous integration and delivery. Here are a few good posts about setting up continuous integration and delivery pipelines to get you started:
- What Is CICD? What's Important and How to Get It Right
- How Kubernetes Can Improve Your CI/CD Pipeline
- Building a Continuous Delivery Pipeline with Git & Jenkins
- About the Author
- Latest Posts

How To Create A Tag For Docker Image
Source: https://stackify.com/docker-build-a-beginners-guide-to-building-docker-images/
Posted by: wellsdresse.blogspot.com
0 Response to "How To Create A Tag For Docker Image"
Post a Comment